


A Comprehensive Technical Guide to the Operation and Application of Electrostatic Discharge Simulators
Introduction
Electrostatic Discharge (ESD) represents a significant and pervasive threat to the reliability and functional integrity of electronic systems across virtually all modern industries. As a high-intensity, transient electromagnetic phenomenon, ESD can induce catastrophic failure, latent damage, or operational upset in electronic components and assemblies. To mitigate these risks, rigorous testing in accordance with international standards is mandatory. This process is facilitated by specialized instrumentation known as an ESD Simulator, or ESD Gun. This article provides a detailed, formal examination of the proper methodology for utilizing an ESD Simulator, with a specific technical focus on the LISUN ESD61000-2C ESD Simulator. The discourse will encompass operational protocols, underlying testing principles, industry-specific applications, and the critical parameters that define testing efficacy.
Fundamental Principles of Electrostatic Discharge Simulation
The core objective of an ESD simulator is to replicate the discharge events that occur in real-world environments, primarily the Human Body Model (HBM) as defined in standards such as IEC 61000-4-2. The simulator generates pulses that mimic the discharge from a charged human body or object to a device under test (DUT). The key waveform parameters—rise time, peak current, and current decay—are strictly defined. For instance, the IEC 61000-4-2 standard specifies a contact discharge waveform with a rise time of 0.7–1 ns and peak currents of 4 A (for 2 kV test level) and 8 A (for 4 kV test level). The LISUN ESD61000-2C is engineered to produce these standardized waveforms with high fidelity, ensuring that the stress imposed on the DUT is consistent and reproducible, thereby allowing for valid comparative assessments of ESD robustness.
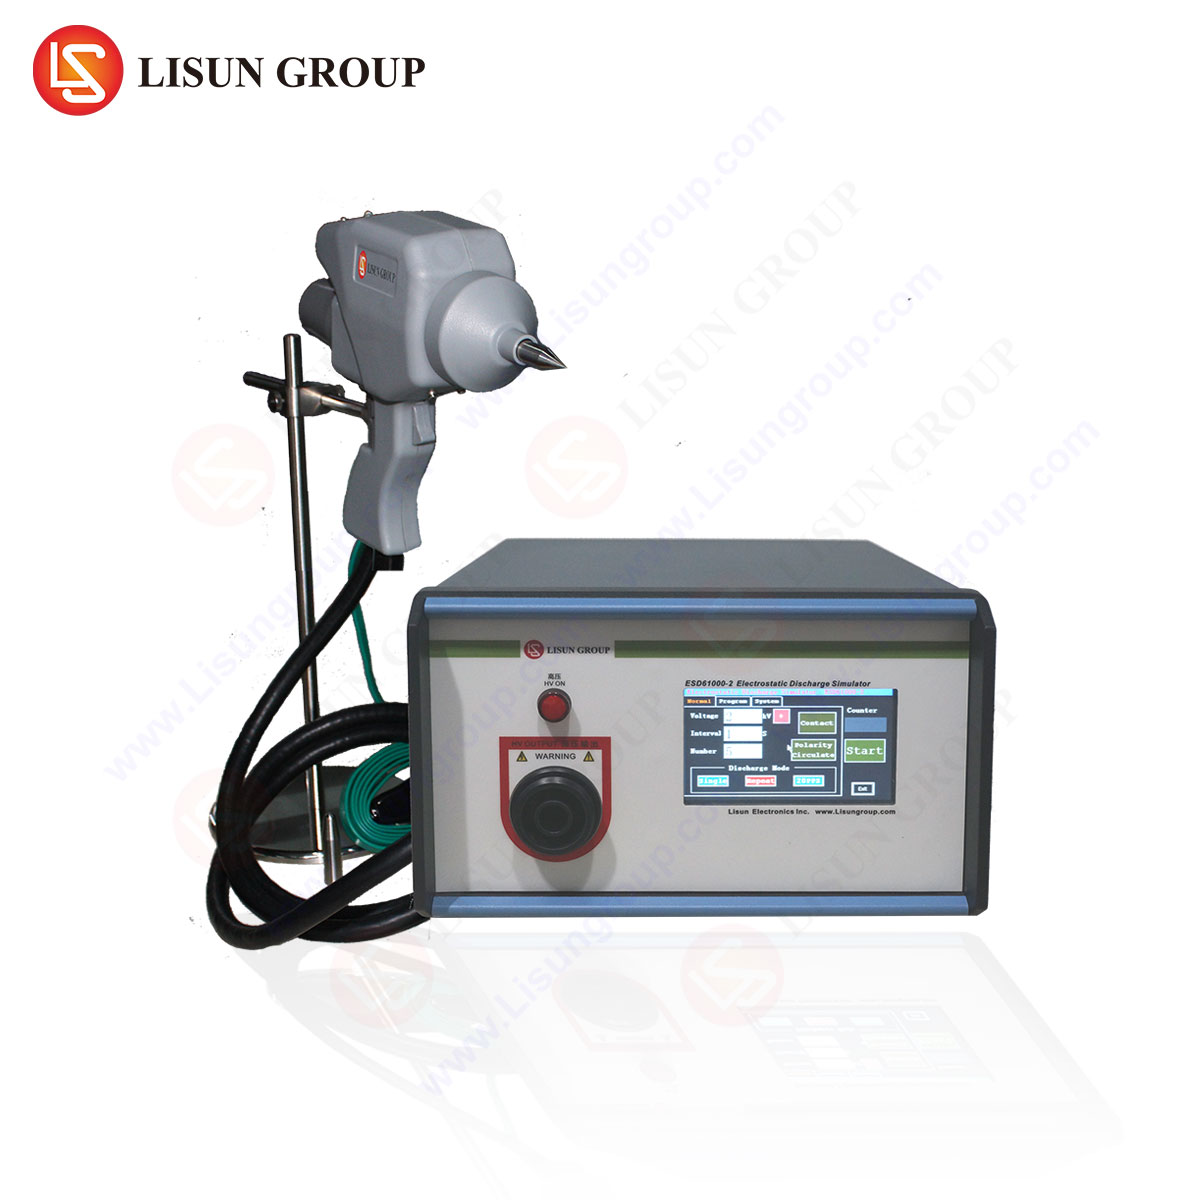
Architectural Overview and Key Specifications of the LISUN ESD61000-2C
The LISUN ESD61000-2C is a fully compliant test system designed for IEC 61000-4-2 and related standards. Its architecture comprises a high-voltage DC power supply, energy storage capacitors, discharge resistors, a relay-based discharge switch, and the discharge tip (gun). A detailed understanding of its specifications is prerequisite to correct operation.
Table 1: Key Specifications of the LISUN ESD61000-2C Simulator
| Parameter | Specification |
| :— | :— |
| Test Voltage | 0.1 kV – 30 kV (air discharge); 0.1 kV – 20 kV (contact discharge) |
| Test Mode | Contact Discharge, Air Discharge |
| Polarity | Positive, Negative |
| Discharge Network | 150 pF / 330 Ω (IEC 61000-4-2 HBM) |
| Output Current Waveform | Compliance with IEC 61000-4-2: Rise time 0.7–1 ns, Peak current as per standard |
| Discharge Interval | 0.05 – 9.99s programmable |
| Discharge Count | 1 – 9999 programmable |
| Verification | Integrated current target for waveform verification (e.g., 2 Ω target) |
The instrument’s competitive advantages lie in its precision voltage control, exceptional waveform consistency, robust construction for industrial environments, and user-friendly interface that simplifies complex test sequence programming. The inclusion of a dedicated current target for periodic waveform verification is a critical feature for maintaining long-term test accuracy and laboratory accreditation.
Pre-Test Configuration and Laboratory Setup
Proper laboratory configuration is essential to ensure valid, repeatable results and operator safety. The test environment must include a Ground Reference Plane (GRP), typically a copper or aluminum sheet, upon which the test setup is placed. The ESD simulator’s ground return cable must be connected directly and securely to the GRP with low-inductance straps. The Device Under Test (DUT) is placed on an insulated tabletop, typically 0.1m above the GRP. For tabletop equipment, a Horizontal Coupling Plane (HCP) is placed on the insulated support and coupled to the GRP via a specified resistor (typically 470 kΩ). For floor-standing equipment, a Vertical Coupling Plane (VCP) is used similarly. All system grounds, including that of the ESD simulator, auxiliary equipment, and coupling planes, must be bonded to the GRP at a single point to prevent ground loops.
Operational Procedure for Contact and Air Discharge Testing
Testing proceeds in two primary modes: Contact Discharge and Air Discharge. Contact discharge is the preferred and more reproducible method, applied to conductive surfaces and coupling planes. The discharge tip is placed in direct contact with the DUT or coupling plane before the discharge is triggered via the gun’s switch. Air discharge simulates arcs from the gun to non-conductive surfaces or gaps in enclosures. The charged tip is approached slowly toward the test point until an arc occurs.
- Initialization and Verification: Prior to testing, verify the simulator’s waveform using the provided current target and an oscilloscope with sufficient bandwidth (≥2 GHz). Confirm peak current and rise time align with IEC 61000-4-2 requirements.
- DUT Configuration: Configure the DUT in its representative operating mode. For comprehensive testing, multiple operational states should be evaluated.
- Test Point Selection: Identify test points based on the product standard. These typically include any user-accessible conductive parts, insulation gaps, slots, vents, and indicators.
- Test Execution:
- Contact Discharge: Set the simulator to the required test level (e.g., ±4 kV for typical severity). Press the discharge tip firmly against the test point. Activate the trigger. The unit will discharge at the pre-programmed interval for the set count.
- Air Discharge: Set a higher voltage (e.g., ±8 kV). Slowly and steadily approach the test point with the discharge tip until a spark jumps. The simulator will then cycle as programmed.
- Discharge Application: Apply at least ten single discharges (positive and negative polarity) to each selected test point, with an interval of at least one second between discharges to allow for charge dissipation.
- Performance Criteria Evaluation: Throughout the test, monitor the DUT for performance degradation. Standards define criteria from “Normal performance within specification” (Criteria A) to “Loss of function requiring operator intervention” (Criteria C).
Industry-Specific Application Contexts and Use Cases
The application of ESD testing via the ESD61000-2C is critical across diverse sectors:
- Automotive Industry & Rail Transit: Electronic Control Units (ECUs), infotainment systems, and sensor modules are tested to stringent OEM specifications often derived from ISO 10605, which modifies the IEC network for vehicle environments. Testing ensures resilience against discharges from occupants during entry/exit or maintenance.
- Medical Devices & Household Appliances: For patient-connected equipment (defibrillators, monitors) or smart appliances, ESD immunity is a safety imperative. Discharges can occur from users to control panels or data ports, potentially disrupting critical functions.
- Communication Transmission & Intelligent Equipment: Base station modules, routers, and industrial IoT gateways must maintain data integrity during ESD events. Testing focuses on RJ45 ports, antenna connectors, and external interfaces.
- Lighting Fixtures & Power Equipment: LED drivers and power converters in industrial lighting or grid equipment are susceptible. Testing is applied to external casings and control terminals.
- Instrumentation & Electronic Components: Bench-top analyzers and discrete components (in system-level tests) are evaluated to ensure measurement accuracy is not compromised by transient interference.
- Aerospace & Spacecraft: While subject to more specialized standards (e.g., DO-160, MIL-STD), the fundamental HBM test principle applies to cabin entertainment systems and avionics sub-assemblies.
Advanced Testing Methodologies and Troubleshooting
Beyond basic compliance, advanced techniques enhance test value. Indirect Discharge involves discharging to the HCP or VCP near the DUT to evaluate coupling of radiated fields. System-Level Testing assesses the entire product in its final configuration, including all peripherals. A common troubleshooting scenario involves inconsistent air discharge results. This is often attributable to variable approach speed, humidity, or tip geometry. The use of a robotic arm for air discharge, as supported by advanced systems like the ESD61000-2C via remote interfaces, eliminates human variability. Another critical practice is the post-test diagnostic analysis, correlating specific failure modes (e.g., microcontroller reset, memory corruption) with the injection point to guide targeted circuit-level hardening.
Calibration, Maintenance, and Metrological Traceability
To ensure ongoing accuracy, the ESD simulator must undergo periodic calibration, typically annually. Calibration involves verifying the output voltage accuracy and, most importantly, characterizing the discharge current waveform using a calibrated current target and oscilloscope. The LISUN ESD61000-2C’s design facilitates this process. Routine maintenance includes visual inspection of cables and connectors for wear, cleaning of the discharge tip to prevent oxidation, and verification of ground strap integrity. All calibration activities must be traceable to national or international standards to uphold the validity of test reports for regulatory submissions.
FAQ Section
Q1: What is the critical difference between contact and air discharge testing, and when should each be applied?
Contact discharge is applied to conductive surfaces accessible to the user and provides highly reproducible results. Air discharge is applied to insulating surfaces or where contact discharge is not physically possible (e.g., through vents). It is inherently less reproducible due to environmental factors. The product family standard or IEC 61000-4-2 itself dictates the applicable method for each test point.
Q2: How often should the output waveform of the ESD simulator be verified, and what are the consequences of an out-of-tolerance waveform?
Waveform verification should be performed daily before critical testing sessions and after any maintenance or impact. An out-of-tolerance waveform (e.g., slow rise time, low peak current) invalidates all subsequent testing. It can lead to under-stressing the DUT, providing a false sense of robustness, or in rare cases, over-stressing it with non-compliant energy.
Q3: In testing a medical device with a metallic enclosure, we observe different failure levels when discharging to different seams on the enclosure. Why does this occur?
The variation is likely due to differences in the impedance path from the discharge point to the internal circuitry. A discharge at a seam closer to a internal printed circuit board (PCB) ground pour will have a lower-inductance path, potentially injecting higher-frequency components more efficiently into sensitive nodes, compared to a discharge at a point with a longer, more inductive path to the same circuit.
Q4: Can the LISUN ESD61000-2C be used for testing to the Charged Device Model (CDM) standard?
No. The ESD61000-2C is specifically designed for the Human Body Model (HBM) as per IEC 61000-4-2. CDM testing, which simulates the discharge from a charged device to a ground, requires a fundamentally different test head, discharge network, and waveform generation circuitry. LISUN offers dedicated CDM simulators, such as the ESD-CDM series, for that specific test methodology.
Q5: What is the significance of the ground return cable’s length and placement during setup?
The ground return cable carries the high-frequency discharge current. Its length and routing directly add inductance to the discharge loop, which can alter the waveform’s rise time and peak amplitude. The standard mandates a specific length (typically 2m). The cable should be routed away from other equipment and not coiled tightly, to minimize parasitic coupling and ensure consistent waveform delivery to the DUT.